TOC
Open TOC
OS EX Persistence
存储设备原理
core dump
- ulimit -c 可以修改 core file size
/proc/sys/kernel/core_pattern指定了 core dump 文件格式
$ cat /proc/sys/kernel/core_pattern|/usr/lib/systemd/systemd-coredump %P %u %g %s %t %c %h挺怪,好像存储在 /var/lib/systemd/coredump/ 中
$ man systemd-coredump1-Bit 信息的存储
磁 (磁带、磁盘)
现代 HDD 都有很好的 firmware 管理磁盘 I/O 调度
$ cat /sys/block/sda/queue/scheduler[mq-deadline] kyber bfq noneSoC
坑 (光盘)
克服只读的限制
- 使用持久化数据结构 (append-only)
- How do rewriteable CDs work?
挖坑 - 光刻
电 (Flash SSD)
每一个 SSD 里都藏了一个完整的计算机系统

- FTL - Flash Translation Layer
- Wear Leveling - 软件管理那些可能出问题的 blocks
重新思考状态的存储
- NVM 来了 - 主存的机器状态不会断电丢失
- 但寄存器/缓存依然是 volatile 的
- 计算机系统是否会经历彻底的重新设计
输入输出设备
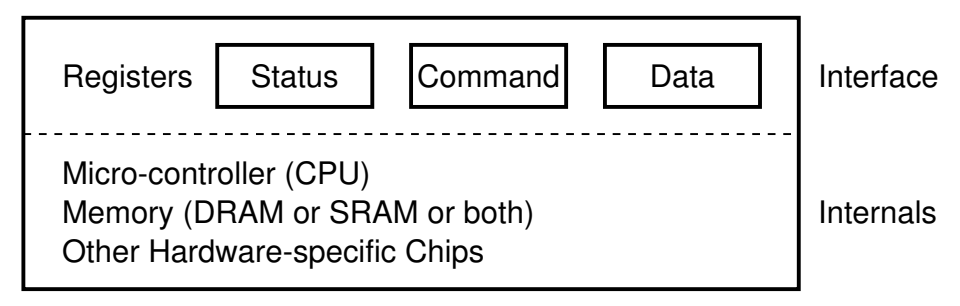
I/O 设备
一个能与 CPU 交换数据的接口/控制器
- 串口
- 键盘控制器
- 磁盘控制器
- 打印机
特殊的 I/O 设备
总线
提供设备的注册和地址到设备的转发
AM - pci-probe.c
00:00 device 1237 by vendor 808600:01 device 7000 by vendor 808600:02 device 1111 by vendor 123400:03 device 100e by vendor 8086 <-- This is an Intel e1000 NIC card!一些命令
❯ lspci -tv-[0000:00]-+-00.0 Intel Corporation 440FX - 82441FX PMC [Natoma] +-01.0 Intel Corporation 82371SB PIIX3 ISA [Natoma/Triton II] +-01.1 Intel Corporation 82371AB/EB/MB PIIX4 IDE +-02.0 VMware SVGA II Adapter +-03.0 Intel Corporation 82540EM Gigabit Ethernet Controller +-04.0 InnoTek Systemberatung GmbH VirtualBox Guest Service +-05.0 Intel Corporation 82801AA AC'97 Audio Controller +-06.0 Apple Inc. KeyLargo/Intrepid USB +-07.0 Intel Corporation 82371AB/EB/MB PIIX4 ACPI \-0d.0 Intel Corporation 82801HM/HEM (ICH8M/ICH8M-E) SATA Controller [AHCI mode]❯ lsusb -tv/: Bus 01.Port 1: Dev 1, Class=root_hub, Driver=ohci-pci/12p, 12M ID 1d6b:0001 Linux Foundation 1.1 root hub |__ Port 1: Dev 3, If 0, Class=Human Interface Device, Driver=usbhid, 12M ID 80ee:0021 VirtualBox USB Tablet中断控制器
APIC (Advanced PIC)
- local APIC: 中断向量表,IPI, 时钟,……
- I/O APIC: 其他 I/O 设备
DMA
一个专门执行 memcpy 程序的 CPU
GPU 和异构计算
NES Picture Processing Unit (PPU)
- CPU 描述
- PPU 执行
回顾打印机
- PostScript 描述
- Latex 编译
- 打印机 执行
现代 GPU - 一个通用计算设备
一个完整的众核多处理器系统
注重大量并行相似的任务
Dark Silicon Age 和异构计算
能完成同一件事的部件可能有很多
要选择功耗/性能/时间最合适的那个
- CPU
- GPU
- NPU
- RDMA
- ……
设备驱动程序
设备驱动程序原理
操作系统将设备抽象为
- read - 从设备某个指定的位置读出数据
- write - 向设备某个指定位置写入数据
- ioctl - 读取/设置设备的状态
设备驱动程序把系统调用 (read/write/ioctl/…) 翻译成与设备寄存器的交互
回顾 shell 将用户指令翻译成系统调用
字符设备
/dev/pts/[x] - pseudo terminal
$ tty/dev/pts/1$ echo hello > /dev/pts/2字节流以内的功能
- ANSI Escape Code
python3 -m rich
字节流以外的功能
stty -a- isatty (3), termios (3)
- 大部分都是 ioctl 实现的
/dev/zero
$ head -c 16 /dev/zero | xxd00000000: 0000 0000 0000 0000 0000 0000 0000 0000 ................读取为全零
可用于创建空文件
/dev/null
$ head -c 16 /dev/null | xxd读取 read(3, "", 4096) = 0 返回 0
写入 write(1, "hello\n", 6) = 6 看似全部写入,实际上哪里都没写
/dev/random, /dev/urandom - 随机数生成器
❯ head -c 16 /dev/urandom | xxd00000000: 580a 2a4a 1c32 ce2d 9ade 8b1c 5d91 de56 X.*J.2.-....]..V自制核弹设备
launcher.c
本质上是为 file_operations 结构体提供实现
static struct file_operations fops = { .owner = THIS_MODULE, .read = lx_read, .write = lx_write,};联系 L2 中的设备模块
makefile 文件
obj-m := launcher.oKDIR := /home/vgalaxy/Downloads/linux-5.17.3
default:  $(MAKE) -C $(KDIR) M=$(PWD)  cp launcher.ko ../initramfs/nuke/
clean:  $(MAKE) -C $(KDIR) M=$(PWD) clean
.PHONY: module clean
需要指定 linux 内核的目录
并且要求 vmlinuz 的版本与之一致
构建大失败
$ makemake -C /home/vgalaxy/Downloads/linux-5.17.3 M=/home/vgalaxy/Desktop/virtual-machine-repository/code/linux-minimal/launchermake[1]: Entering directory '/home/vgalaxy/Downloads/linux-5.17.3' CC [M] /home/vgalaxy/Desktop/virtual-machine-repository/code/linux-minimal/launcher/launcher.o/home/vgalaxy/Desktop/virtual-machine-repository/code/linux-minimal/launcher/launcher.c: In function ‘lx_write’:/home/vgalaxy/Desktop/virtual-machine-repository/code/linux-minimal/launcher/launcher.c:81:3: warning: ignoring return value of ‘copy_from_user’ declared with attribute ‘warn_unused_result’ [-Wunused-result] 81 | copy_from_user(databuf, buf, count); | ^~~~~~~~~~~~~~~~~~~~~~~~~~~~~~~~~~~WARNING: Symbol version dump "Module.symvers" is missing. Modules may not have dependencies or modversions. You may get many unresolved symbol warnings. MODPOST /home/vgalaxy/Desktop/virtual-machine-repository/code/linux-minimal/launcher/Module.symversWARNING: modpost: "unregister_chrdev_region" [/home/vgalaxy/Desktop/virtual-machine-repository/code/linux-minimal/launcher/launcher.ko] undefined!WARNING: modpost: "class_destroy" [/home/vgalaxy/Desktop/virtual-machine-repository/code/linux-minimal/launcher/launcher.ko] undefined!WARNING: modpost: "class_unregister" [/home/vgalaxy/Desktop/virtual-machine-repository/code/linux-minimal/launcher/launcher.ko] undefined!WARNING: modpost: "device_destroy" [/home/vgalaxy/Desktop/virtual-machine-repository/code/linux-minimal/launcher/launcher.ko] undefined!WARNING: modpost: "device_create" [/home/vgalaxy/Desktop/virtual-machine-repository/code/linux-minimal/launcher/launcher.ko] undefined!WARNING: modpost: "cdev_add" [/home/vgalaxy/Desktop/virtual-machine-repository/code/linux-minimal/launcher/launcher.ko] undefined!WARNING: modpost: "cdev_init" [/home/vgalaxy/Desktop/virtual-machine-repository/code/linux-minimal/launcher/launcher.ko] undefined!WARNING: modpost: "__class_create" [/home/vgalaxy/Desktop/virtual-machine-repository/code/linux-minimal/launcher/launcher.ko] undefined!WARNING: modpost: "alloc_chrdev_region" [/home/vgalaxy/Desktop/virtual-machine-repository/code/linux-minimal/launcher/launcher.ko] undefined!WARNING: modpost: "__stack_chk_fail" [/home/vgalaxy/Desktop/virtual-machine-repository/code/linux-minimal/launcher/launcher.ko] undefined!WARNING: modpost: suppressed 4 unresolved symbol warnings because there were too many) CC [M] /home/vgalaxy/Desktop/virtual-machine-repository/code/linux-minimal/launcher/launcher.mod.omake[3]: *** No rule to make target 'scripts/module.lds', needed by '/home/vgalaxy/Desktop/virtual-machine-repository/code/linux-minimal/launcher/launcher.ko'. Stop.make[2]: *** [scripts/Makefile.modpost:140: __modpost] Error 2make[1]: *** [Makefile:1746: modules] Error 2make[1]: Leaving directory '/home/vgalaxy/Downloads/linux-5.17.3'make: *** [Makefile:5: default] Error 2进入系统后,安装设备模块
busybox insmod /nuke/launcher.ko查看设备模块
busybox lsmod生成 /dev/nuke
mknod /dev/nuke0 c 237 0mknod /dev/nuke1 c 237 1GPU 驱动程序
cuda
非常复杂
- 全套的工具链
- gcc → nvcc
- binutils → cuobjdump
- cuobjdump —dump-ptx / —dump-sass
- Parallel Thread Execution ISA
- gdb → cuda-gdb
- perf → nvprof
- …
- API 的实现
- cudaMemcpy, cudaMalloc, …
- Kernel 的执行
- 大部分通过 ioctl 实现
- 设备的适配
块设备
Linux Block I/O Layer
文件系统和磁盘设备之间的接口
文件系统只需在 Block I/O API 上构建的持久数据结构

文件系统 API
文件系统:虚拟磁盘
- 提供合理的 API 使多个应用程序能共享数据
- 提供一定的隔离,使恶意/出错程序的伤害不能任意扩大
虚拟磁盘命名管理 (目录)
信息的局部性:将虚拟磁盘 (文件) 组织成层次结构
mount
将设备挂载到一个设备代表的目录树
mount -t type device dir例如共享文件夹的挂载
mount -t vboxsf shared-dir /home/vgalaxy/Desktop/sharedshared-dir 即为虚拟机抽象出的一个设备
Linux 启动中根文件系统的切换
export PATH=/binbusybox mknod /dev/sda b 8 0busybox mkdir -p /newrootbusybox mount -t ext2 /dev/sda /newrootexec busybox switch_root /newroot/ /etc/init示意图如下
通过 pivot_root (2) 实现根文件系统的切换
loopback (回环) 设备
回顾挂载过程
$ sudo mount disk.img demo$ lsblkNAME MAJ:MIN RM SIZE RO TYPE MOUNTPOINTSloop0 7:0 0 1M 0 loop /home/vgalaxy/Desktop/virtual-machine-repository/code/persistence/demosda 8:0 0 70G 0 disk├─sda1 8:1 0 60G 0 part /├─sda2 8:2 0 8G 0 part [SWAP]├─sda3 8:3 0 2G 0 part /boot└─sda4 8:4 0 8M 0 partsr0 11:0 1 2.6G 0 romdisk.img 和 demo 之间多了一层抽象 loop0
相当于将 disk.img 磁盘镜像文件抽象成了 loopback 设备,再将 loopback 设备挂载到目录树上
共享文件夹的挂载似乎观察不到这个过程
目录管理:创建/删除/遍历
mkdirrmdirrm -rf
getdentsreaddir
合适的 API + 合适的编程语言
from pathlib import Path
for f in Path('/proc').glob('*/status'):    print(f.parts[-2], \        (f.parent / 'cmdline').read_text() or '[kernel]')
hard link
目录中仅存储指向文件数据的指针
$ touch a$ ln a b对应的系统调用
linkat(AT_FDCWD, "a", AT_FDCWD, "b", 0) = 0ls -i 查看 index number
a 和 b 对应的 index number 相同
$ rm b对应的系统调用
unlinkat(AT_FDCWD, "b", 0)symbolic link
类似快捷方式
链接指向的位置当前不存在也没关系
$ touch a$ ln -s a b对应的系统调用
symlinkat("a", AT_FDCWD, "b") = 0软链接也是文件,可以创建软连接的硬链接
任意链接允许创建任意有向图
- 自环
$ ln -s . a于是
$ pwd/home/vgalaxy/Desktop/virtual-machine-repository/code/persistence/a/a/a/a/a/a/a/a/a/a/a/a/a/a/a/a/a/a/a/a/a/a/a/a/a/a/a/a/a/a/a/a/a/afish.c自动机的目录版本
#!/bin/bash
# Create directoriesmkdir -p A B C D E F
# Create automatonln -s ../B 'A/<'ln -s ../C 'B/>'ln -s ../D 'C/<'ln -s ../E 'A/>'ln -s ../F 'E/<'ln -s ../D 'F/>'ln -s ../A 'D/_'
观察从某个目录开始可以跳转出的路径
$ find -L A | tr -d '/'find: File system loop detected; ‘A/</>/</_’ is part of the same file system loop as ‘A’.find: File system loop detected; ‘A/>/</>/_’ is part of the same file system loop as ‘A’.AA<A<>A<><A>A><A><>当前目录
pwd命令或$PWD环境变量可以查看- chdir 系统调用修改
- 对应 shell 中的 cd
- 注意 cd 是 shell 的内部命令
线程是否共享 working directory
#include "thread.h"#include <assert.h>#include <fcntl.h>#include <stdio.h>#include <stdlib.h>#include <sys/stat.h>#include <unistd.h>
static const char *dir_1 = "../";static const char *dir_2 = "../..";static const char *file_name = "demo";
void worker() {  int ret;  if (rand() % 2) {    printf("create %s at %s\n", file_name, dir_1);    ret = chdir(dir_1);    assert(ret == 0);    ret = creat(file_name, O_RDONLY);  } else {    printf("create %s at %s\n", file_name, dir_2);    ret = chdir(dir_2);    assert(ret == 0);    ret = creat(file_name, O_RDONLY);  }}
int main(int argc, char *argv[]) {  for (int i = 0; i < 2; i++) {    create(worker);  }}
观察到在 .. 和 ../../.. 创建了 demo
所以线程共享 working directory
虚拟磁盘 (文件)
文件描述符:进程访问文件 (操作系统对象) 的指针
- 通过 open/pipe 获得
- 通过 close 释放
- 通过 dup/dup2 复制
- fork 时继承
mmap
void *mmap(void *addr, size_t length, int prot, int flags, int fd, off_t offset); // 映射 fd 的 offset 开始的 length 字节int munmap(void *addr, size_t length);int msync(void *addr, size_t length, int flags);offset
方便了程序员顺序访问文件
父子进程共享偏移量
- 操作系统管理偏移量
- 操作系统保证
write的原子性
FAT 和 UNIX 文件系统
自底向上设计实现数据结构
数据结构课程的假设
- 冯诺依曼计算机
- Random Access Memory (RAM)
- Word Addressing
- 每条指令执行的代价是
- Memory Hierarchy 在苦苦支撑这个假设
- cache-unfriendly 代码也会引起性能问题
文件系统的假设
- 按块访问
- 在磁盘上构建 RAM 模型完全不切实际
Block device 提供的设备抽象
struct block blocks[NBLK]; // 磁盘void bread(int id, struct block *buf) { memcpy(buf, &blocks[id], sizeof(struct block));}void bwrite(int id, const struct block *buf) { memcpy(&blocks[id], buf, sizeof(struct block));}在 bread/bwrite 上实现块的分配与回收
int balloc(); // 返回一个空闲可用的数据块void bfree(int id); // 释放一个数据块在 balloc/bfree 上实现磁盘的虚拟化
- 文件 -
vector<char> - 用链表/索引/任何数据结构维护
- 支持任意位置修改和 resize 两种操作
在文件基础上实现目录
- 目录文件 - 将
vector<char>解读成vector<dir_entry> - 连续的字节存储一个目录项 (directory entry)
下面主要关注文件和目录的实现
File Allocation Table (FAT)
文件就是 struct block * 的链表
FAT 集中保存所有 next 指针

目录就是 32-byte 定长目录项的集合
操作系统在解析时把标记为目录的目录项当做目录即可
code
开辟空间并快速格式化
$ /bin/yes | head -c 104857600 > fs.img
$ mkfs.fat -F 32 -v fs.imgmkfs.fat 4.2 (2021-01-31)fs.img has 8 heads and 32 sectors per track,hidden sectors 0x0000;logical sector size is 512,using 0xf8 media descriptor, with 204800 sectors;drive number 0x80;filesystem has 2 32-bit FATs and 1 sector per cluster.FAT size is 1576 sectors, and provides 201616 clusters.There are 32 reserved sectors.Volume ID is fb270f26, no volume label.
$ file fs.imgfs.img: DOS/MBR boot sector, code offset 0x58+2, OEM-ID "mkfs.fat", Media descriptor 0xf8, sectors/track 32, heads 8, sectors 204800 (volumes > 32 MB), FAT (32 bit), sectors/FAT 1576, serial number 0xfb270f26, unlabeled
挂载拷贝文件
$ sudo mount fs.img /mnt$ sudo cp -r ../linux-minimal /mnt$ sudo umount /mnt打印文件信息
$ gcc fatree.c$ ./a.out fs.img | vim -性能
- 大文件的随机访问性能差
- 在 FAT 时代,磁盘连续访问性能更佳,使用时间久的磁盘会产生碎片
可靠性
- 维护若干个 FAT 的副本防止元数据损坏,额外的同步开销
- 损坏的 cluster 在 FAT 中标记
ext2/UNIX 文件系统
inode

为大小文件区分 fast/slow path
- 小的时候用数组
- direct blocks
- 大的时候用树
- indirect blocks
性能
- 大文件的随机读写性能提升明显
- inode 在磁盘上连续存储,便于缓存/预取
可靠性
- 存储 inode 的数据块损坏是很严重的
持久数据的可靠性
威胁模型
- 硬件故障
- 软件故障
RAID
应对硬件故障
把多个 (不可靠的) 磁盘虚拟成一块非常可靠且性能极高的虚拟磁盘
RAID 是一个反向的虚拟化
- 进程:把一个 CPU 分时虚拟成多个虚拟 CPU
- 虚存:把一份内存通过 MMU 虚拟成多个地址空间
- 文件:把一个存储设备虚拟成多个虚拟磁盘
RAID (虚拟化) = 虚拟磁盘块到物理磁盘块的映射
- RAID-1
条带化,备份所有数据
提升可靠性
- RAID-0
条带化,非冗余
提升性能
- RAID-10 = RAID-0 over RAID-1
- RAID-4: Parity Disk
- RAID-5: Rotating Parity
RAID simulator
measuring read/write Performance
更快、更可靠、近乎免费的大容量磁盘
- 革了高可靠性磁盘的命
- 成为今天服务器的标准配置
- 类似的里程碑
- The Google file system (SOSP’03) 和 MapReduce: Simplified data processing on large clusters (OSDI’04) 开启大数据时代
- 把多个 (不可靠的) 计算机虚拟成一台非常可靠且性能极高的计算机
- 革了数据中心的命
FSCK
应对软件故障
对文件系统的任何操作,都涉及多处磁盘的修改
- FAT
- 目录文件 (文件大小)
- 数据
磁盘不提供多块读写 all or nothing 的支持
- 甚至为了性能,没有顺序保证
- bwrite 可能被乱序
- 所以磁盘还提供了 bflush 等待已写入的数据落盘
这就带来了崩溃一致性 (Crash Consistency) 的问题
为此引入 File System Checking (FSCK)
根据磁盘上已有的信息,恢复出最可能的数据结构
Journaling
FSCK 并不是应对崩溃一致性的最好方法
数据结构的存储有两个视角
- 存储实际数据结构
- 文件系统的直观表示
- crash unsafe
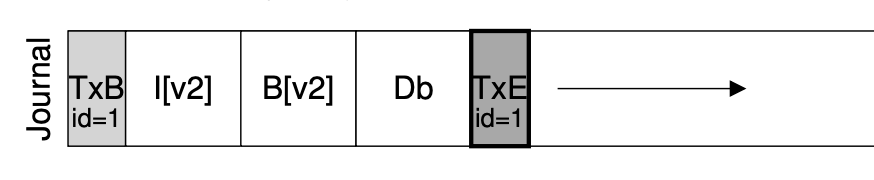
- Append-only 记录所有历史操作
- 重做所有操作得到数据结构的当前状态
- 容易实现崩溃一致性
于是只要实现 (2) append-only 的崩溃一致性
就可以实现 (1) 的崩溃一致性
- 数据结构操作发生时,用 (2) append-only 记录日志
- 日志落盘后,用 (1) 更新数据结构
- 崩溃后 redo log 即可
对于实现 Atomic Append,可以参考
tracer 的彩蛋
git: @git add $(shell find . -name "*.c") $(shell find . -name "*.h") -A --ignore-errors @while (test -e .git/index.lock); do sleep 0.1; done @(uname -a && uptime) | git commit -F - -q --author='tracer-nju <tracer@nju.edu.cn>' --no-verify --allow-empty @sync由于 git 似乎没有解决崩溃一致性,所以需要强制 sync
xv6 文件系统实现
mkfs
// Disk layout:// [ boot block | sb block | log | inode blocks | free bit map | data blocks ]可以知道每一部分的含义
- boot block - 启动加载器
- sb block (super block) - 文件系统元数据
- log - 日志 - 崩溃恢复
- inode blocks
- free bitmap - balloc/bfree
- data blocks
apis
- rsect/wsect (bread/bwrite)
- balloc/bzero
- ialloc
- iappend
- rinode/winode
tracer
追踪文件系统的创建
使用 python 写 gdb 脚本
TRACED = 'bwrite balloc ialloc iappend rinode winode rsect wsect'.split()IGNORE = 'ip xp buf'.split()
class trace(gdb.Breakpoint):    def stop(self):        f, bt = gdb.selected_frame(), []        while f and f.is_valid():            if (name := f.name()) in TRACED:                lvars = [f'{sym.name}={sym.value(f)}'                    for sym in f.block()                    if sym.is_argument and sym.name not in IGNORE]                bt.append(f'\033[32m{name}\033[0m({", ".join(lvars)})')            f = f.older()        print('    ' * (len(bt) - 1) + bt[0])        return False # won't stop at this breakpoint
gdb.execute('set prompt off')gdb.execute('set pagination off')for fn in TRACED:    trace(fn)gdb.execute('run fs.img README user/_ls')gdb.execute('quit')
大概是对于给定的断点,当触发时打印出调用轨迹和参数
使用如下方式进行调试
gdb -ex 'source mkfs/trace.py' mkfs/mkfs为此安装了 Ubuntu 21.10
注意 launch.json 的 gdb 为 gdb-multiarch
出现如下错误
Python Exception <class 'RuntimeError'>: Cannot locate block for frame.是因为 mkfs 没有调试信息
需要修改 Makefile 添加 -ggdb 选项
下面是 tracer 的输出
nmeta 46 (boot, super, log blocks 30 inode blocks 13, bitmap blocks 1) blocks 954 total 1000
wsect(sec=0)wsect(sec=1)...wsect(sec=998)wsect(sec=999)
wsect(sec=1)
首先 xv6 的文件系统共 1000 blocks
每个 blocks 占 1024 字节
每个 inode 占 64 字节
计算出 log / inode / bitmap 需要的 block
并记录在结构体 superblock 中
然后通过 wsect 置每个 block 为空
再将 superblock 写入磁盘镜像中
memset(buf, 0, sizeof(buf)); memmove(buf, &sb, sizeof(sb)); wsect(1, buf);ialloc(type=1) winode(inum=1) rsect(sec=32) wsect(sec=32)下面为根目录分配 inode
uintialloc(ushort type){  uint inum = freeinode++;  struct dinode din;
  bzero(&din, sizeof(din));  din.type = xshort(type);  din.nlink = xshort(1);  din.size = xint(0);  winode(inum, &din);  return inum;}
得到空闲的 inode 号
此处的 bzero 存在 log 操作
记录信息并写入到磁盘镜像中
voidwinode(uint inum, struct dinode *ip){  char buf[BSIZE];  uint bn;  struct dinode *dip;
  bn = IBLOCK(inum, sb);  rsect(bn, buf);  dip = ((struct dinode*)buf) + (inum % IPB);  *dip = *ip;  wsect(bn, buf);}
此处将 inode 号转换为对应的 block 号,也就是 inode blocks 的开头 #32
iappend(inum=1, n=16)    rinode(inum=1)        rsect(sec=32)    rsect(sec=46)    wsect(sec=46)    winode(inum=1)        rsect(sec=32)        wsect(sec=32)
iappend(inum=1, n=16)    rinode(inum=1)        rsect(sec=32)    rsect(sec=46)    wsect(sec=46)    winode(inum=1)        rsect(sec=32)        wsect(sec=32)
然后在根目录的 inode 下添加 . 和 ..
bzero(&de, sizeof(de)); de.inum = xshort(rootino); strcpy(de.name, "."); iappend(rootino, &de, sizeof(de));iappend 比较复杂,基本思路根据 dinode 的 size 找到需要写入的 data blocks,写入数据后,再修改 dinode 的 addrs
初始 size 为 0,找到第一个空闲的 data blocks 为 46,写入 dirent 结构体,其中包含了 inum 和 name,共 16 字节
然后添加文件 README
分配一个新的 inode
ialloc(type=2) winode(inum=2) rsect(sec=32) wsect(sec=32)在根目录的 inode 下添加对应的信息
iappend(inum=1, n=16) rinode(inum=1) rsect(sec=32) rsect(sec=46) wsect(sec=46) winode(inum=1) rsect(sec=32) wsect(sec=32)注意到 dirent 结构体共 16 字节,而 1 个 inode 中可以存放 NDIRECT 个 block addresses,也就是一个目录下也许最多有 1024 / 16 * NDIRECT 个文件
然后将数据写入到 data blocks 中
iappend(inum=2, n=1024) rinode(inum=2) rsect(sec=32) rsect(sec=47) wsect(sec=47) winode(inum=2) rsect(sec=32) wsect(sec=32)iappend(inum=2, n=1024) rinode(inum=2) rsect(sec=32) rsect(sec=48) wsect(sec=48) winode(inum=2) rsect(sec=32) wsect(sec=32)iappend(inum=2, n=178) rinode(inum=2) rsect(sec=32) rsect(sec=49) wsect(sec=49) winode(inum=2) rsect(sec=32) wsect(sec=32)对于 user/_ls 而言同理
然后修正根目录的大小为 block size 的整数倍
最后修改 bitmap 即可
balloc(used=77)balloc: first 77 blocks have been allocatedballoc: write bitmap block at sector 45 wsect(sec=45)debug syscall
- open - 路径解析、创建文件描述符
- read/write - 文件描述符和数据操作
- link - 文件元数据操作
考虑在 shell 中键入 ls
调用轨迹
sys_read -> fileread先从虚拟终端中读取输入 ls
if(f->major < 0 || f->major >= NDEV || !devsw[f->major].read) return -1; r = devsw[f->major].read(1, addr, n);在 ls.c 中再次进行 sys_read
读取 inode
ilock(f->ip); if((r = readi(f->ip, 1, addr, f->off, n)) > 0) f->off += r; iunlock(f->ip);在 ilock 中判断对应的 inode 是否已经从磁盘读取出来
- 若没有,调用
breadbread再调用bget在缓冲区中寻找对应的 block- 若没有,则向虚拟磁盘发起读取请求
- 若有,则直接返回
- 注意 inode 在磁盘
(struct dinode)和内存(struct inode)中的表示是不同的
然后通过 readi 从 inode 中读取数据,这其中又会调用 bread
再考虑键入 echo a > a.txt
sys_write -> filewrite写入 inode 比较复杂
    // write a few blocks at a time to avoid exceeding    // the maximum log transaction size, including    // i-node, indirect block, allocation blocks,    // and 2 blocks of slop for non-aligned writes.    // this really belongs lower down, since writei()    // might be writing a device like the console.    int max = ((MAXOPBLOCKS-1-1-2) / 2) * BSIZE;    int i = 0;    while(i < n){      int n1 = n - i;      if(n1 > max)        n1 = max;
      begin_op();      ilock(f->ip);      if ((r = writei(f->ip, 1, addr + i, f->off, n1)) > 0)        f->off += r;      iunlock(f->ip);      end_op();
      if(r != n1){        // error from writei        break;      }      i += r;    }    ret = (i == n ? n : -1);
这其中涉及到事务和日志等机制
战略性跳过……
fault injection
调试崩溃一致性的实现
Crash = 断电
void crash() { static int count = 100; if (--count < 0) { printf("crash\n"); *((int *)0x100000) = 0x5555; }}(qemu) info mtree0000000000100000-0000000000100fff (prio 0, i/o): riscv.sifive.test添加恒等映射
diff --git a/kernel/vm.c b/kernel/vm.cindex d5a12a0..5c016a4 100644--- a/kernel/vm.c+++ b/kernel/vm.c@@ -24,6 +24,8 @@ kvmmake(void)   kpgtbl = (pagetable_t) kalloc();   memset(kpgtbl, 0, PGSIZE);
+  kvmmap(kpgtbl, 0x100000, 0x100000, PGSIZE, PTE_R | PTE_W);+   // uart registers   kvmmap(kpgtbl, UART0, UART0, PGSIZE, PTE_R | PTE_W);
在 apis 中调用 crash
通过修改 count 得到不同的文件系统快照
进而观察崩溃一致性的实现
现代存储系统
- 文件系统
- 提供了较为简陋的文件索引机制
- 无法保证多操作之间的原子性
- 关系数据库
- SQL
- ACID
- 难以满足 Partition Tolerance

- Key-Value Store
- NoSQL DB
- 分布式系统
- Replicated State Machines
- RaftScope Visualization Tool
- Log-structured Merge (LSM) Trees
Android 系统
- Linux + Framework + JVM
- Android 定义了应用模型
- 支持 Java 是一个非常高瞻远瞩的决定
- 程序员多
- 摩尔定律
Android 应用
一个运行在 Java 虚拟机 (Android Runtime) 上的应用程序
- Platform (Framework)
- NDK (Native Development Kit)
- Java Native Interface (C/C++ 代码)
官方文档 (RTFM)
四大组件
- Activity
- Service
- Broadcast
- ContentProvider

example - Calculator
Android 系统
Platform API 之下 - 一个微内核

Remote Procedure Call (RPC)
example - 如何保活一个 Android 进程
- 成为孤儿进程从而不会立即收到 SIGKILL 信号
- 在被杀死后立即唤醒另一个进程
- 通过构造死锁完成
flock
adb (Android Debug Bridge)
- adb push/pull/install
- adb shell
- screencap /sdcard/screen.png
- sendevent
- adb forward
- adb logcat/jdwp
一系列衍生的工具
- 开发者选项
- scrcpy
- Monkey/UI Automator
从逻辑门到计算机系统
从逻辑门到计算机系统
自底向上
- 数字系统
- 体系结构
- 操作系统
- 编译器
- 编程语言和算法
统计执行指令数
- python gdb script
perf stat -e instructions:u
走得更远
- 并发
分布式系统
- 虚拟化
Microkernel, Exokernel, Unikernel
- 持久化
数据库
相关的 Topics
- Computer Architecture
- 计算机硬件的设计、实现与评估
- Computer Systems
- 系统软件 (软件) 的设计、实现与评估
- Network Systems
- 网络与分布式系统的设计、实现与评估
- Programming Languages
- 状态机 (计算过程) 的描述方法、分析和运行时支持
- Software Engineering
- 程序/系统的构造、理解和经验
- System/Software Security
- 系统软件的安 (safety) 全 (integrity)